Today I learned that MacOS has a native utility to create encrypted disk images, no third party apps needed. It can be used to encrypt and password protect files and folders. I’m talking about the Disk Utility.
The UX of these images is also pretty good, you can double click on them to mount them at which point, it’ll ask you for a password. Once the correct password is entered, the image is mounted and can be used to read/write files on this image.
You can choose between 128-bit AES encryption or 256-bit AES encryption. 256-bit AES encryption would make it pretty secure and basically uncrackable with a strong password.
There are many other options like choosing the filesystem format. Choosing something like ExFat or MS-DOS (FAT) would make it portable across different operating systems, although I have not yet explored how these images could be decrypted on Windows or Linux.
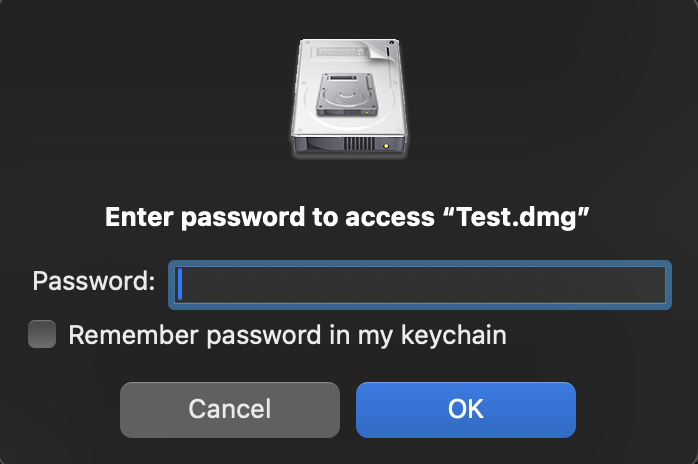
Once the image is created, double clicking on it prompts the user for a password before MacOS mounts it as a regular filesystem.
Step by step:
Open Disk Utility
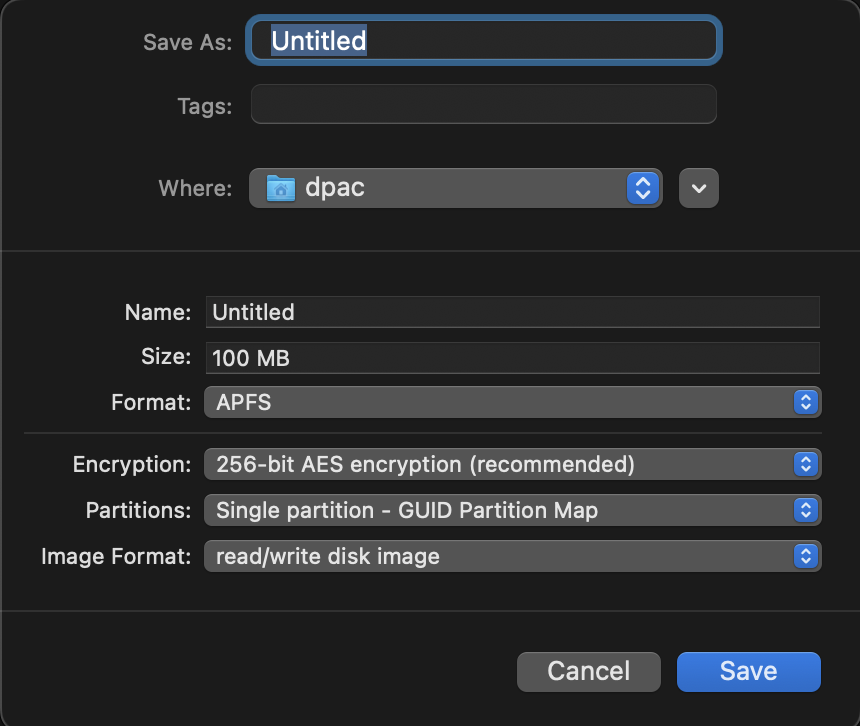
Click on File Menu -> New Image -> Blank Image / Image from Folder...
Specify a Name and Size. Keep in mind you cannot resize the image once you create an image of size, so you should allocate a large enough size to accommodate current and future needs. If you run out of space, your only option is to create a new encrypted image and move all your files from old image to new image.
Set Encryption to 256-bit AES encryption.
Set Image Format as read/write disk image.
Set Format as ExFAT or MS-DOS (FAT) if you want image portability.
Save the image to your desired location.
Double click the image, enter password and click OK to mount it.
Signals are special kind of variables which can automatically ‘signal’ functions when they’re changed.
In context of frontend frameworks, signals will automatically update DOM elements when the signals are modified.
Implementation without using proxy objects
Most implementations you find online focus on using proxy objects to implement signals. In this blog post, we’ll focus on implementation of signals without the use of proxy objects. The goal is to better understand how the underlying mechanisms work.
Let’s start with a basic variable that returns a getter and setter function without any reactivity:
functionsignal(initialValue) {let value = initialValue;constgetter= () => {return value; }constsetter= (v) => { value = v; }return [getter, setter];}
The value is stored in the closure context and as such not directly accessible.
Let’s add an array which will store all the functions that should be re-executed when the value changes.
Now every time the value is changed, we will re-run all the functions that depend on them. But how do we add functions to the subscribers array? Let’s write another function called createEffect, that will be used to run all reactive functions.
let current =null;asyncfunctioncreateEffect(fn: ()=>void) { current = fn;awaitfn(); current =null;}
current variable is used to store the reference of the function being run currently. We’ll use this variable to automatically store the reference to the subscribers array.
let current =null;asyncfunctioncreateEffect(fn: ()=>void) { current = fn;awaitfn(); current =null;}functionsignal(initialValue) {let value = initialValue;let subscribers = [];constgetter= () => {if(current &&!subscribers.includes(current)) { subscribers.push(current); }return value; }constsetter= (v) => { value = v; subscribers.forEach(async (fn)=>{awaitfn(); }); }return [getter, setter];}
What the heck is going on? I know, just bear with me. We store reference to the current function being executed in the current variable. When we read the signal (call the getter function) in this current function, the reference to current function gets automatically added to the signal’s subscribers array. This way we don’t have to manage dependencies manually.
Let’s use this implementation to create some reactive code:
const [count, setCount] =signal(0);createEffect(()=>{ console.log("Count is ", count());});setCount(5);setCount(10);// Output:// Count is 0// Count is 5// Count is 10
This is a very basic implementation of signals without the use of proxy objects. We can extend this for objects and arrays, however we will not delve into that in this post.
You can play around with this implementation on stackblitz:
You’ve probably heard a lot of clever people talk about parser combinators and there’s a good reason for it. They are brilliantly simple in their design but can be used to build arbitrarily complex parsers. The resulting code reads like grammar. They demonstrate the simplicity and power of functional programming. They are beautiful and elegant, period.
Parsers
Parsers are simple functions that will parse a small part of the string like a single character or a number. You can then combine these tiny parsers using combinators to create a big parser.
Parser is a function that takes string (that needs to be parsed) and returns an array of (string, string) tuple.
The tuple’s first element is the parsed content and the remaining string as the second element.
typeParser= (code:string) => [string,string][];
You might be wondering why are we returning an array of tuples and not just a single tuple. We could have multiple parse results if the parser we’re writing is indeterminate for eg; a greedy vs non-greedy parser. An array of tuples allows us to represent such results.
An empty array returned from a parser thus means failure to parse.
That’s cool, but what the heck is a combinator?
A combinator is a function that takes one or more parsers and return a single parser, effectively combining them.
typeCombinator= (...p:Parser[]) =>Parser;
Things will get much more clearer once you see a simple implementation of a combinator.
Let’s code
Let’s write a couple of very simple parsers in typescript.
The digit parser will parse a single digit from the front of the string. Similarly, char parser parses a single char from the front of the string.
literal matches a literal string. It is a little different, it’s a function that returns a parser. Since we need to pass additional data to literal, we use currying instead of modifying our Parser type.
How do we combine them?
Introducing sequence combinator, lovingly called as seq
We can use this parser to validate if a cron expression is valid or not. Note that we have not taken the command part of the cron expression into account.
In later parts of this series, we will extend this parser combinator to add support for capturing parsed values of the string into a parse tree.